
Walking tour apps are fun for visitors and a life-saver for you. Visitors can learn all about the site and listen to high-quality audio that enhances their overall experience.
Meanwhile, your organization enjoys lower overhead by not having to staff group tour guides 24/7.
You can finally do away with old-school audio equipment and allow visitors to use their own mobile devices.
If you’re interested in creating your own app for walking tours, keep reading for our recommendations on affordable technology and the steps to get the job done.
Top Use Cases for Walking Tour Apps
Walking tour apps are great for all sorts of non-profit organizations, tour guide companies, and government agencies.
They’re most commonly offered by:
- Museums
- Galleries
- Universities
- Public parks
- Cultural centers
- Wineries
- Cities
- Neighborhoods and regions
Depending on the nature of your company or organization, you can either charge a fee for the walking tour app (such as a $5.99 one-time charge), or you can offer it for free to all visitors.
Either way, it provides a welcome alternative to group tours for people who’d rather go at their own pace.
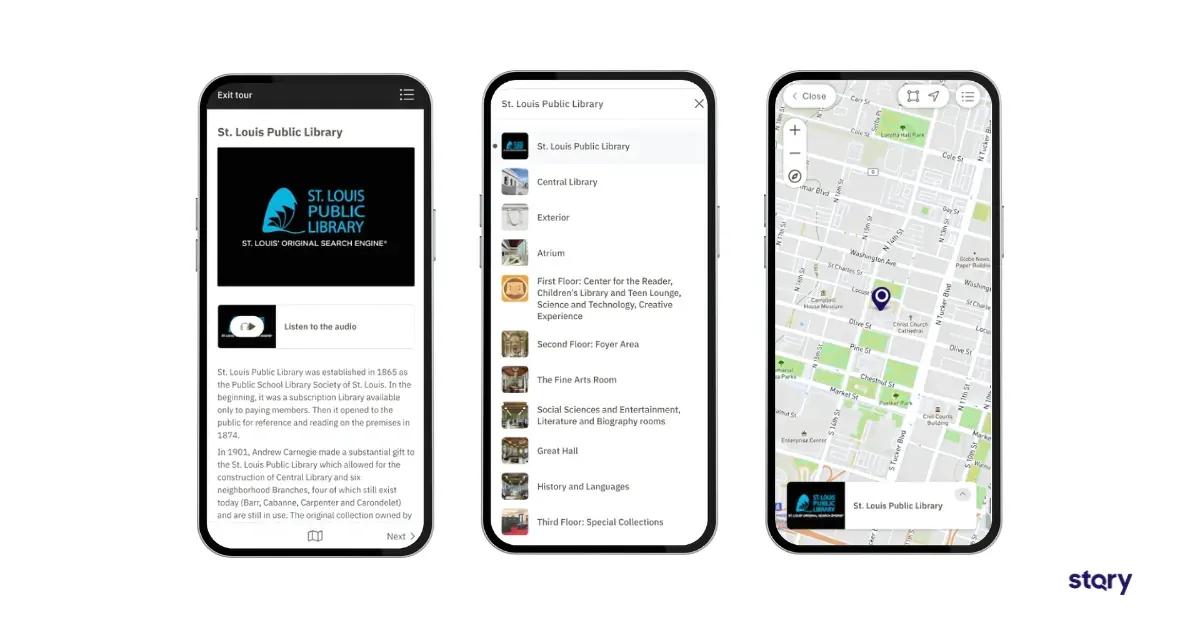
A great example of a walking tour app is from the St. Louis Public Library. It allows visitors to learn about the history and architecture of the library without disturbing the silence.
What Tech Do You Need to Create a Walking Tour App?
Building a tour guide app is easier and more affordable than you might assume.
Typically, it can cost $100,000 to $500,000 to develop a mobile app with a software development agency.
Then, you can expect to pay $3,000 to $10,000 in monthly maintenance fees after your initial investment. The time it takes to launch a custom app ranges from 6 to 18 months.
However, you don’t have to go the custom route when building a walking tour app. You can use no-code software instead.
STQRY Apps is an excellent no-code app builder designed specifically for multimedia tour guides. You can create a variety of tours and stops, all with their own content.
All of the app customization and content uploads can be managed easily by non-technical staff on your team.
The timeline and cost for app builders are far better than with development. You can expect to launch your app in a matter of weeks and pay just a couple thousand dollars per year.
7 Steps for Building a Walking Tour App
Now that you know to use a no-code app builder, creating your app will be one thousand times easier.
Follow these simple steps to build an app your visitors will love.
1. Strategize the walking path and tour content
The first step is to strategize your tour (or tours if you want to create several in one app). You’ll need to consider the important sites, assets, or artwork that you want to highlight, as well as the best path through them.
Work with all stakeholders and start sketching things out on a physical or virtual whiteboard. Then, make your final decisions.
You can have as many tours as you want within your app, but each tour should include around 5 to 15 stops.
2. Write audio scripts
Walking tours are typically audio guides—you wouldn‘t want to encourage people to watch videos while they walk around. That’s why you should create audio content for each of your stops. People can meander around while they listen to the information.
It’s best to write the audio scripts and get them approved by all stakeholders.
When writing your scripts, consider the number of voiceover artists. Will you have one artist read each script in its entirety? Or will you assign different voiceover artists to different roles to tell a story?
Also, consider any existing audio tracks you might include. Each audio track should be 3 to 7 minutes. The longer it takes to walk from one stop to another, the longer the audio track can be.
3. Record your audio
Now it’s time to record your audio. Use voiceover artists from a site like Voices or Voquent. Layer in historical audio files or special effects that will really set the mood or transport visitors to another time.
Make sure to record tracks with a high-quality microphone and with as minimal background noise as possible.
4. Add text descriptions and images
The next step is to create the other content that you need to accompany your tour.
To create an attractive multimedia app, you should also include an image for each stop. This will help visitors match up what they’re seeing in real life and know that they’re listening to the correct content.
You might also want to write a short text description for each stop and provide the audio transcript to improve accessibility.
5. Setup location-based content triggers
If you’d like, you can use location-based triggers so that notifications for content appear when visitors are nearby a stop, or so that the walking tour can autoplay from one track to the next as people meander through the site.
Most walking tour apps use Bluetooth technology, which works well over short distances. For longer routes such as driving tours, GPS is usually the better choice.
To make tours more accessible, many apps let users download content in advance. This allows the tour to run offline, which is helpful in areas with limited or no internet access.
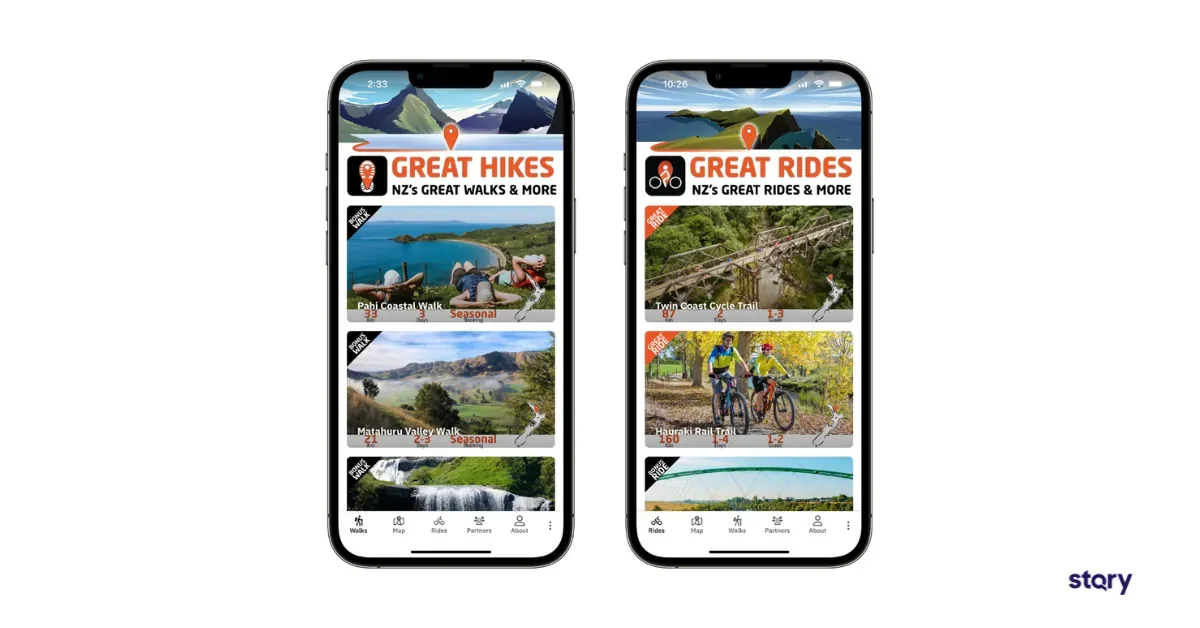
A great example is the Great Rides App, the official partner of the NZ Cycle Trail. It is the only app designed specifically for the New Zealand Great Rides and gives cyclists access to maps, audio commentary, and trail information even when offline.
If you’re not sure which is right for you, don’t worry. The STQRY team is here to help you set up your app every step of the way.
6. Update the branding of the walking tour app
Now it’s time to customize the look and feel of your app.
This includes:
- The home screen header
- Your organization’s logo
- The main colors and accent colors
It’s important to create an on-brand digital experience so that the app feels like a natural extension of your organization.
Because the tour content should be front and center, you’ll only need to do some basic branding.
7. Add informational pages if desired
The final step is to add an “About” or “Info” page to your app. You can use this page to share contact information, hours of operation, and frequently asked questions.
If you want to use your app to sell tickets for additional experiences, you might want to create a separate page for that as well. You can embed a payment processor for tickets, dinner reservations, memberships, donations, and more.
These pages will appear in your app menu so that users can navigate to them at any time.
And of course, once you’ve launched your app, make sure to get feedback from users to see if anything can be improved.
You might also want to talk with internal stakeholders to ensure that the app is meeting the original business goals, such as improved visitor experience or less strain on staff.
Create World-Class Digital Experiences for Your Visitors with STQRY
STQRY makes it simple to bring your walking tours to life. You don't need any coding skills to build and launch a custom app in just a few weeks. Your team can easily upload audio, add images and text, and set up location-based triggers using one easy-to-use platform.
Whether you manage a museum, city tour, or public park, STQRY helps you offer engaging self-guided experiences that visitors can enjoy at their own pace. It also saves your organization time and money by reducing the need for in-person guides and outdated equipment.
Ready to create a better visitor experience with less time, cost, and hassle?